AppVentiX is an alternative third-party product that can be used for Software Distribution in a corporate environment. Known originally as a simple replacement for the App-V Server, it has grown in capabilities, both in the types of packages supported and in different kinds of infrastructures it may be placed into, including both on-prem and in the cloud. In this article, I take a look at the newest version of AppVentiX, version 3.7.25.
AppVentiX takes a simpler approach to application package management than you might be used to. The typical architecture of most of these systems consists of three tiers: Server, Database, and Client Agents. AppVentiX simplifies this by eliminating the Database, and allowing their “server” software to deployed on either a server or desktop OS. This makes the solution ideal for smaller organizations, and yet can scale up to larger organizations with Enterprise needs.
The equivalent to the database are a small number of XML files that contains the necessary mappings between packages, users, and/or machines. We really do not need a complicated relational database to do this. The configuration files may be stored on any kind of file storage device, allowing for redundancy or backup as needed.
The “server” software is a GUI console called AppVentiX Central View. This software understands App-V, AppX, MSIX, and AppAttach formatted application packages. It supports both deployment to both persistent clients as well as non-persistent (pooled VDI) and semi-persistent (RDS and Multi-User OS) scenarios. Deployment assignments may be to Active Directory OUs or Security Groups, or using Azure AD (Entra). And both user or machine based assignments are supported.
There is a client agent that is needed on the end-points. This may be made available as part of the client image, delivered via traditional deployment software, or delivered from Central View itself. This agent consists of a Windows Service and a GUI for troubleshooting.
AppVentiX uses a “pull” methodology rather an a “push” one like Configuration Manager or Intune. This means that the server side does not include a service of any kind. Upon login, the client will read the configuration share and know what to do. There is also a cache on the client to handle network disruptions.
Once packages are initially assigned in Central View, new users are typically assigned to packages by modifying the backing group in AD or Entra Id.
Storage Setup
You will need a place for central storage of the packages and for the AppVentiX Central View configuration.
These storages may be in simple file shares, or cloud storage like Azure Files. For this walk-through, I used what the AppVentiX documentation refers to as “Integrated Authentication” in a traditional AD environment.
I first created two shares on a file server, one for configuration and another holding the packages.
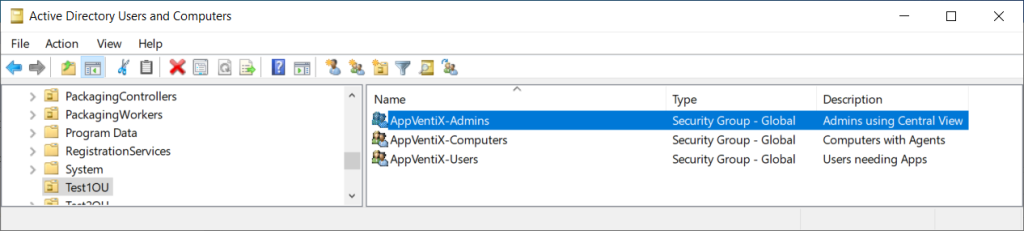
These folders were shared as SMB shares, and certain permissions are needed on the shares (and folders/files). Central View uses the user login account to access the shares, but the agent service will be using its computer account. While existing OUs or Security Groups could be used, I created new security groups for this purpose:
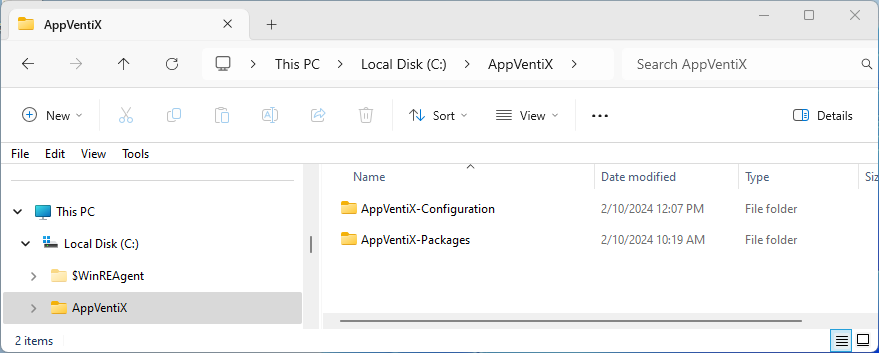
In addition to these two shared folders, Central View also creates and uses a folder in the local C:\ProgramData area of the machine it is installed on. You will want to put both that folder, and the two shared folders in your backup plans.
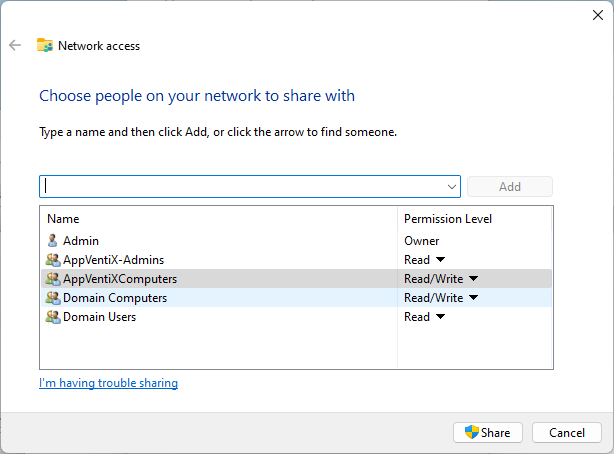
For the configuration share, the computer account for the Central Server, and the computer accounts for any computers that will have the AppVentiX client need write-access. End-user accounts require only read access. Similar permissions for the Package share(s) should also be applied.
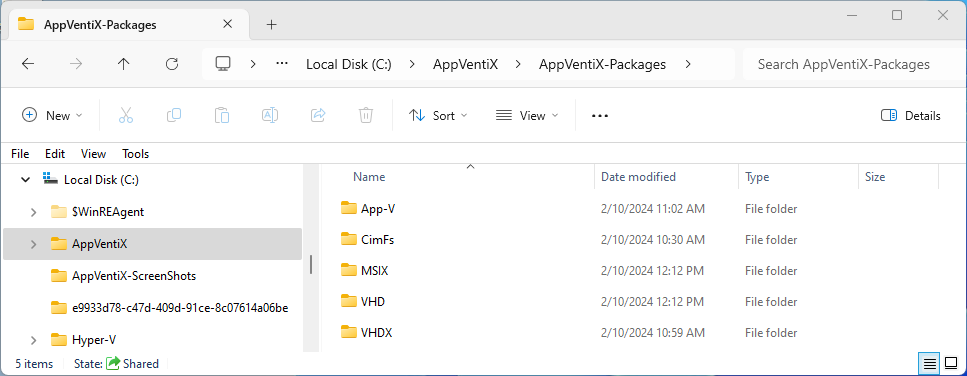
For my setup, I wanted to show a typical scenario of a customer that has an existing App-V package repository that is moving to MSIX for static clients and AppAttach for the dynamic ones, so I have different shared folders for each package type as the packages get migrated over. I also wanted to try out the three different AppAttach formats, VHD, VHDX, and CimFS. (See App Attach Report Card for 2024 (tmurgent.com) for information on these formats and the performance impacts on this choice), so I decided to use separate folders per package technology. This isn’t a requirement, just a personal choice.
Although AppVentiX isn’t specifically designed for multi-site deployments, using DFS replication for both the packages and configuration is possible, assuming that all configuration/assignment changes would be made at the master site.
Installing And Setting up Central View
The AppVentiX MSI installer is straight-forward. Once installed, you will start Central View.
Establishing the Base Configuration
Once you start Central View, it will determine that it hasn’t yet been configured and take you directly to the place where you set the server share location:
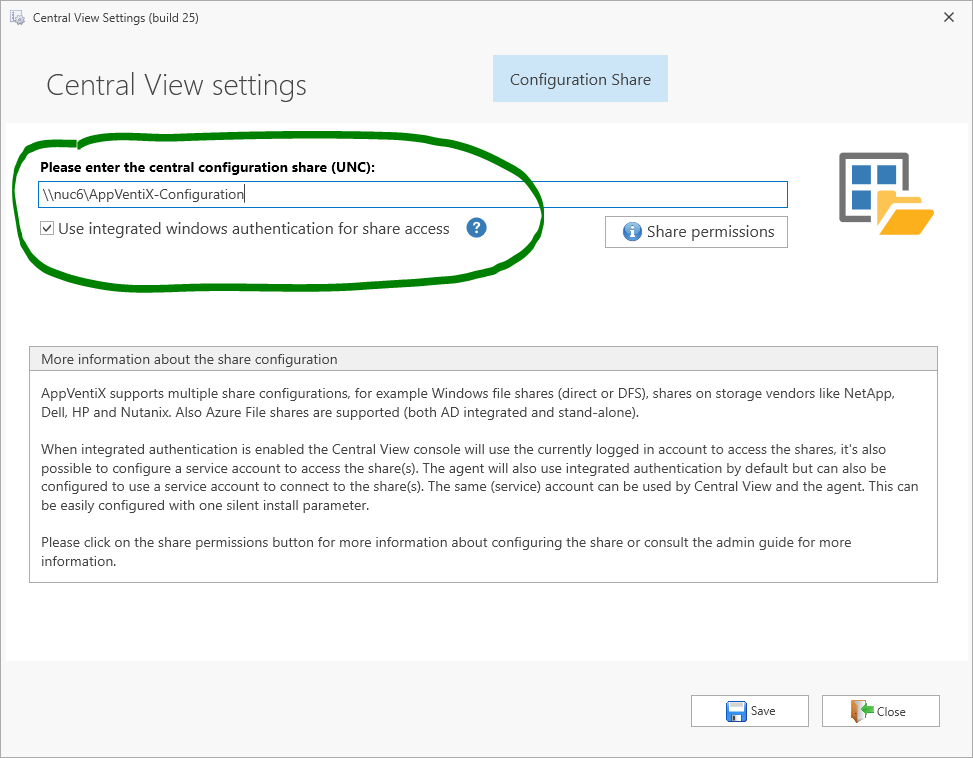
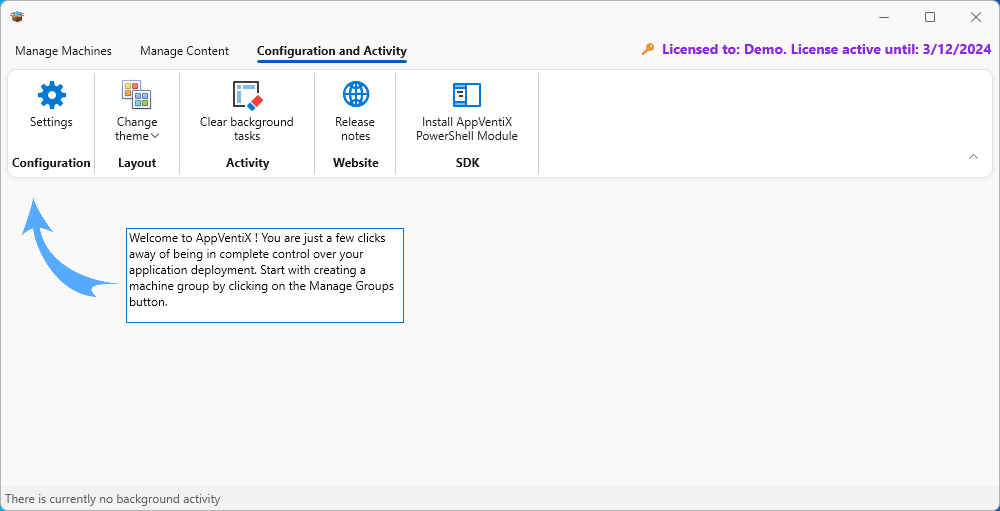
After saving the configuration, the Central View console will appear. In the dialog window, you should return to the Configuration Settings to complete some tasks. In the menu above the ribbon, click Configuration and Activity, then in the ribbon, click the Settings button.
In the settings dialog you can return to the Configuration Share setting that you previously set, but you should go through the Settings, Advanced, and License menus for potential changes.
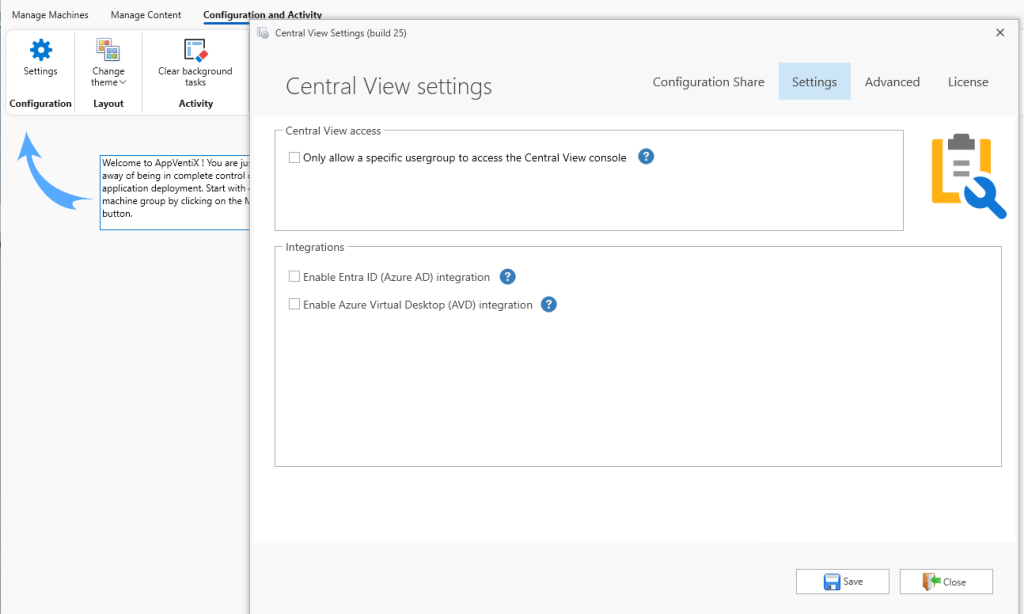
Here, for example is where you would enable Entra ID and AVD integrations. Click the Save button when done.
Managing Client Machines
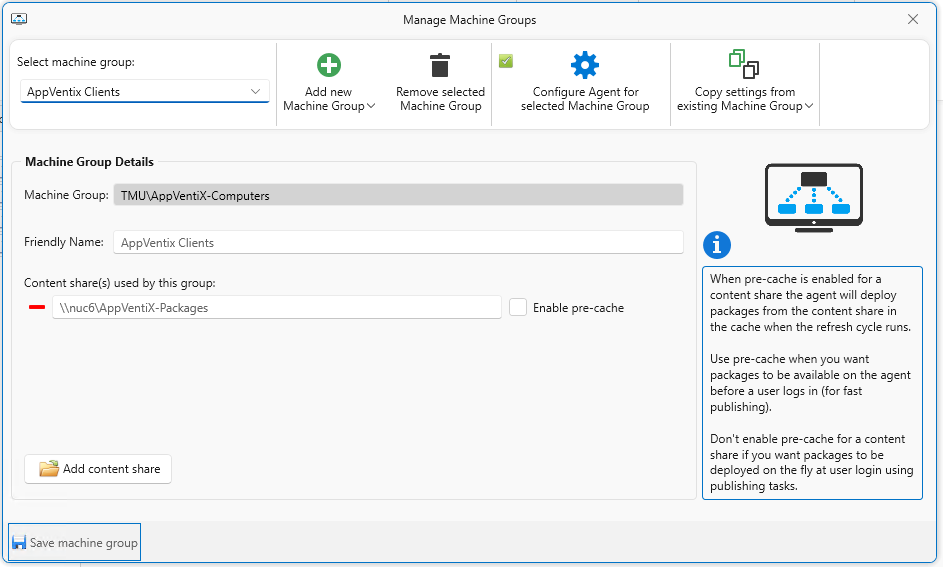
In the main dialog, return to the Manage Machines menu, and in the ribbon click the Manage Groups button.
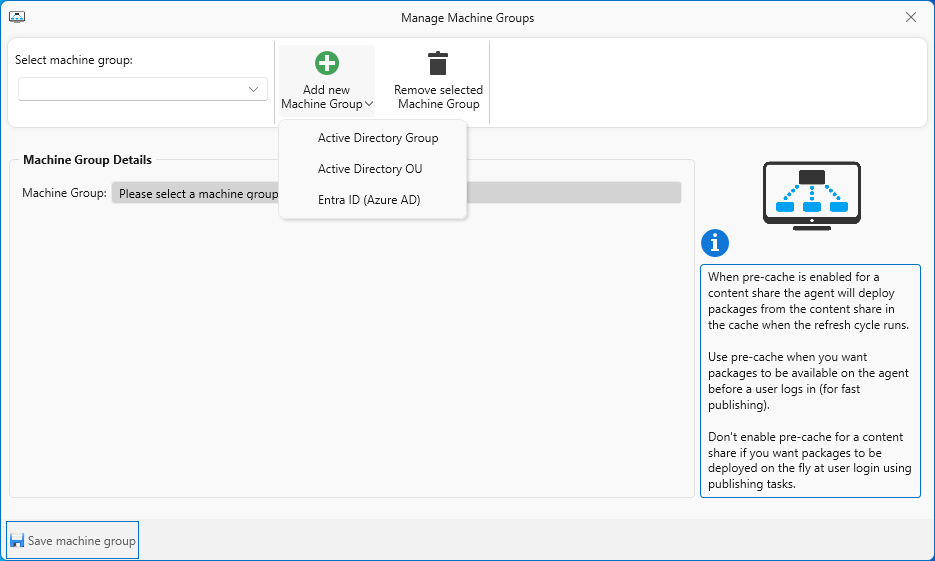
Machine groups are how you specify groups of computers that will have the AppVentiX agent installed. You probably want multiple groups that match your package deployment strategies. The configuration settings for a machine group dictate the kinds of packages supported, and shares where the packages will be found. You might also create these groups based on how you intend to assign packages, but publishing is separate if you desire that level of separation for user-based package assignments.
When you add a group, you can choose the machine members from an AD OU or AD Security Group, or from Entra ID. I selected the AD Security Group that is where I’ve added the computer accounts to any machines that will get the AppVentiX client. You will need to specify the content share (warning, it will “guess” that the share is named “Content”, so make sure you specify the correct share name! There is also an option to identify the group for fast publishing called pre-cache, but probably don’t worry about that yet – get the basics working and you can come back and edit this later. You should specify the share locations for your packages. While I would probably use a subset of the share folders we created earlier for different package types, for this demo I’m just going to specify the top level share for now, and use assignments to users to pick out the packages and types that are appropriate.
Before saving this new group, you want to also click on the Configure Agent for the selected machine group. Here is an example of how I set the general settings so that I could use a combination of App-V, MSIX, and App Attach. I’m not using FS Logix in this lab so I left that off and selected the Local profile option on the MSIX tab.
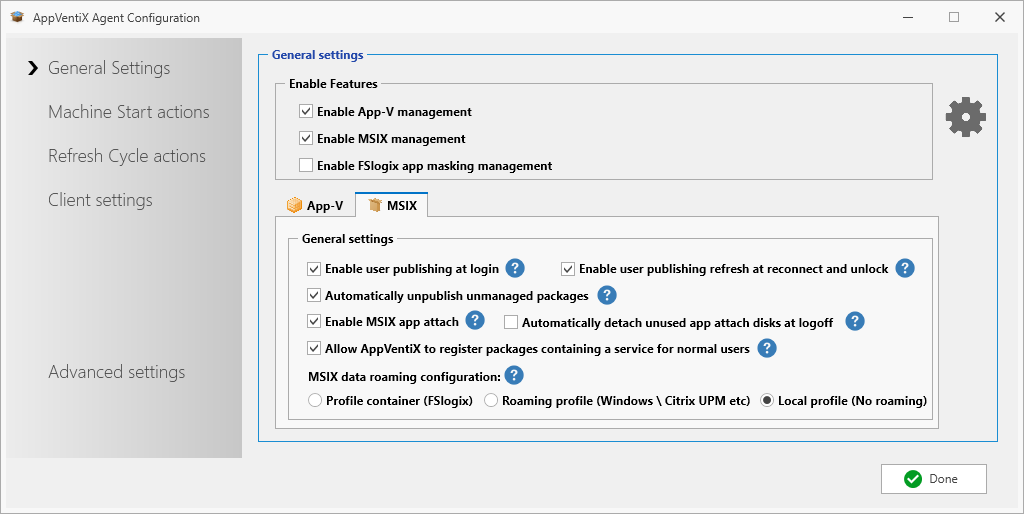
On the left are menus for access to additional actions and settings that might be appropriate for your environment. These should be reviewed and possibly changed before clicking on the Done button to save all changes. These settings will be passed on to the AppVentix agent on the client machines to implement these policies. The Enable-App-V management, for example, will enable the App-V client service on the device automatically for you. Keep in mind that other App-V settings specified here may be overridden by an GPO configuring the App-V client, but with these settings you might no longer need that GPO.
For this simple test I did not need to make any additional changes other than enabling the management and disabling FsLogix profile management. After clicking the Done button, you must click the Save machine group button to save your changes. Then you can add additional machine groups or close the Manage Machine Groups window.
Pushing Agents to the Client Machines
Defining the group does not add the agent to machines in the group automatically. Some organizations will add the agent to the OS image of clients, but here we will use Central View to push the agent to our test changes.
In the main dialog Manage Machines view, use the pulldown to select a machine group. If you selected the group to work with both App-V and MSIX, there will be a prompt to select which technology you want to manage right now. In the image below I selected App-V, but that isn’t important right now as I just want to get the AppVentiX agent pushed to members of the group right now.
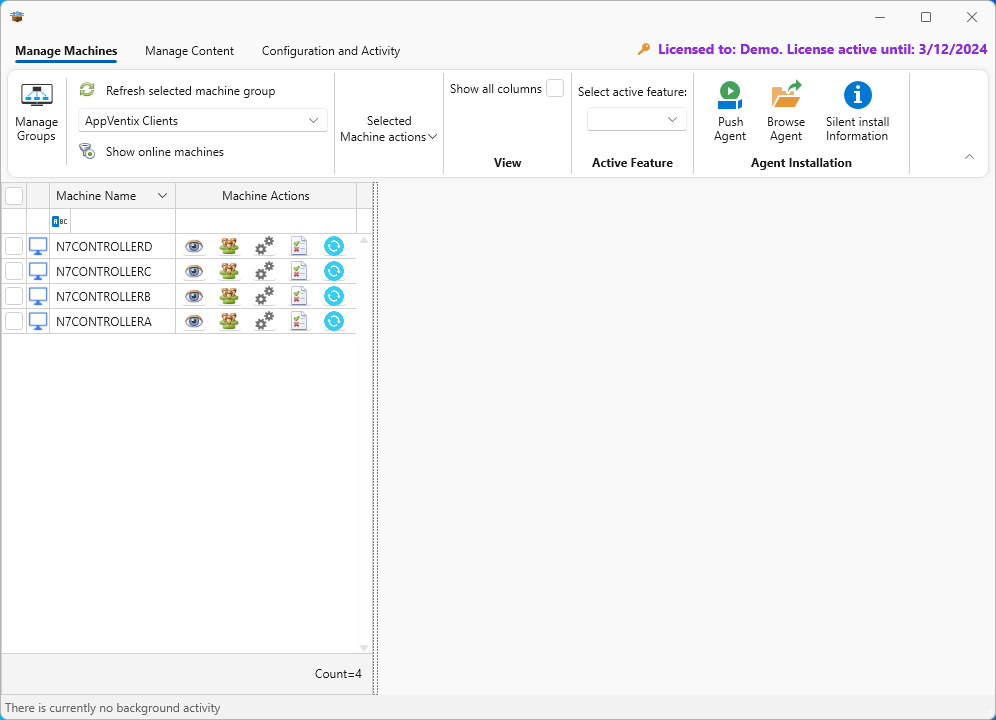
On the left side of the dialog, first select the machines in the machine group that you want to push the agent to. You might need to drag the right edge of the list to make the machine names visible. Then, on the right of the ribbon menu, there is a button to push the agent. There is also a button to take you to the folder where you can find the agent installer and additional silent installation information for the agent if you want to use another way to distribute the agent.
Select machines and then click the Push Agent button. If you see the dialog below, the installations were successful. Pushing the agent install does require requisite permissions for PsExec to perform the installation, not unlike Configuration Manager pushing out the SCCM agent.
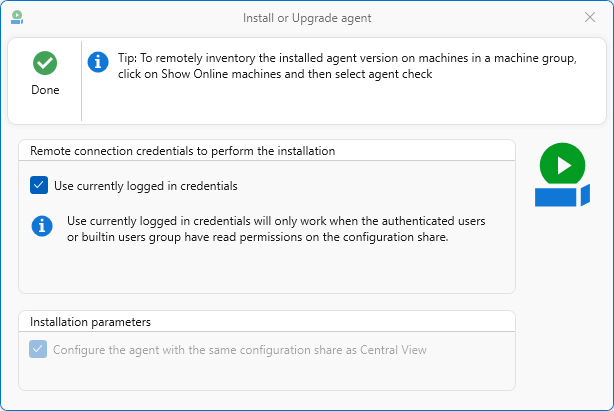
When you want to push the agent out, you must click the button at the top that says Done. It doesn’t seem obvious to me that this is a button and not a statement!
The display will take you to the Configuration and Activity menu display, where you monitor the agents getting pushed, and troubleshoot if necessary. For example, my initial attempt failed as shown here:
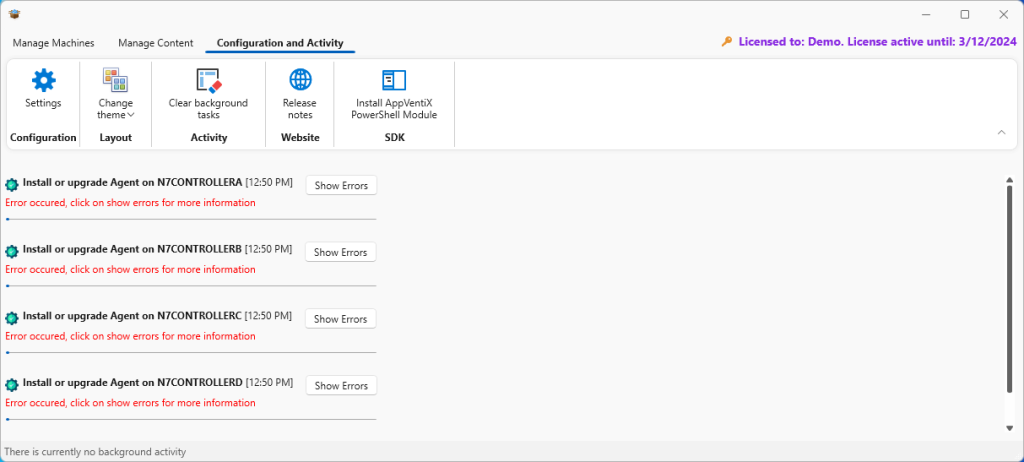
Clicking on the Show Errors button provides additional detail:
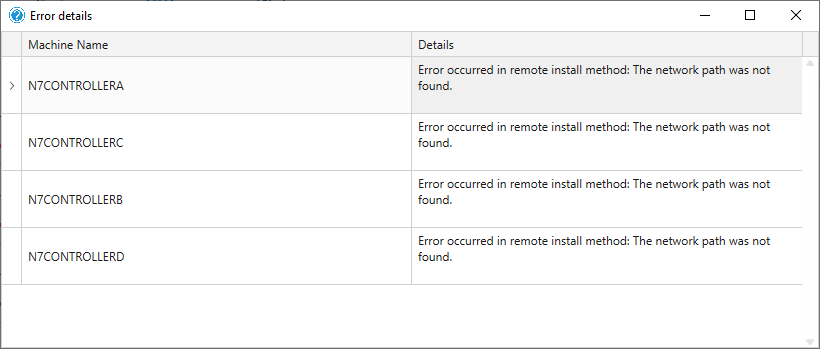
Pushing the agent involves using PsExec to perform a remote command using the admin$ share on the remote device. PsExec has several requirements that might not be present, so you’ll need to google it and try a few things. This might involve the windows firewall port 445 on the remote device, and also adding the domain account of the Central View user to the local administrator group on the end device. But in my case, it was just an old-fashioned DNS issue, and I couldn’t ping the client machine by name.
Fixing these things solved this issue for me, but if you are desperate to just get testing you can manually install the agent from the msi that you can now find in the configuration share.
Even though we are working with both App-V and MSIX, there is still only one agent being pushed out. The remote agent will reach out to the configuration share we set up (in Configuration and Activity) to read configuration files to know what to do.
Let’s look at that share as it stands currently:
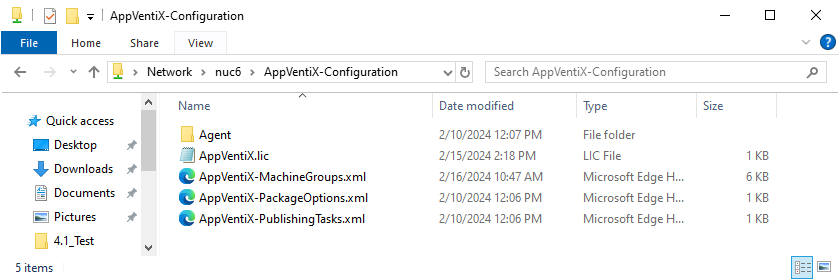
Here you can see the Agent folder (which is where the agent installer lives), the license file for AppVentiX, and the three xml files that form the “database” used by Central View and the agents. Below is a portion of that MachinesGroups file where you can see what we have done so far.
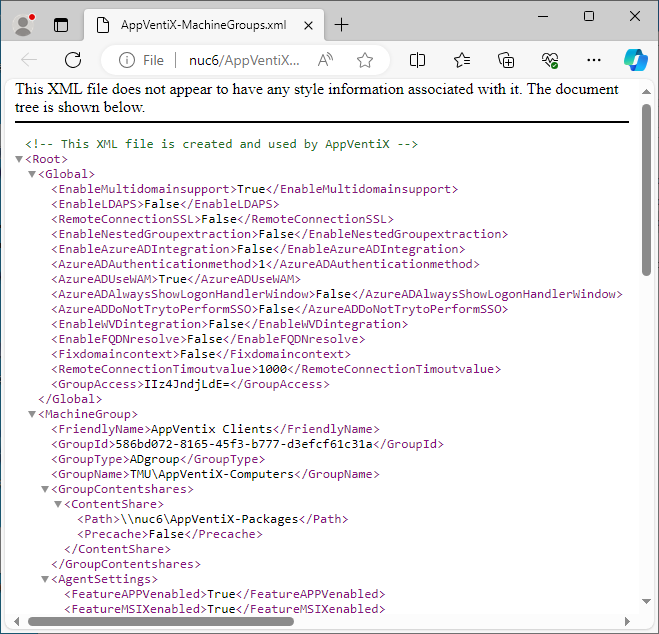
I would guess that AppVentiX doesn’t want you manually editing these files!
Managing and Assigning Content (Packages)
Now we are ready to assign (publish) packages. Click on the Manage Content menu on the dialog.
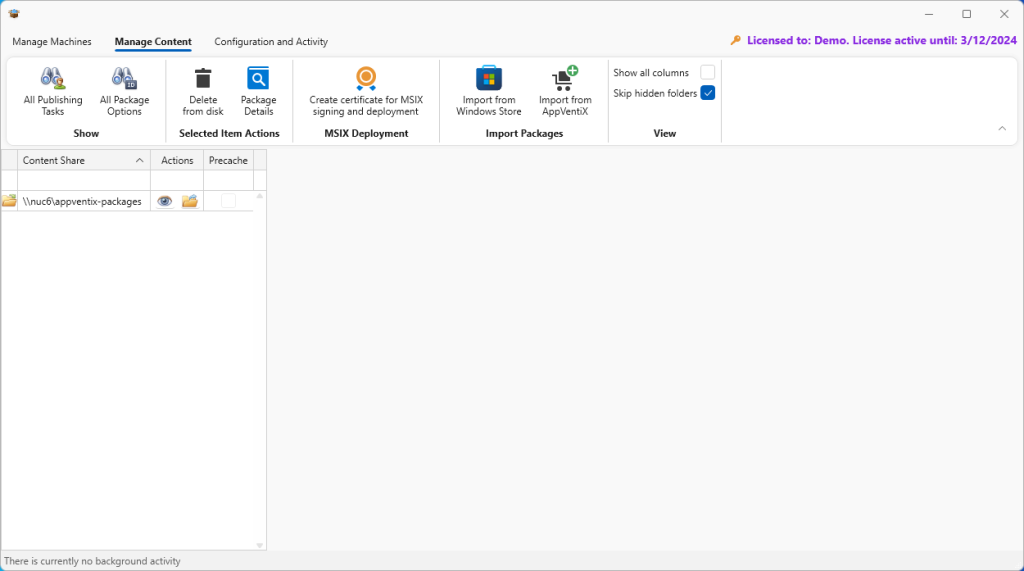
In the Actions column next to the share, click on the inventory (eye) icon to take the initial inventory of packages available for publishing.
Because I have some App Attach packages in the share, I was presented with this dialog:
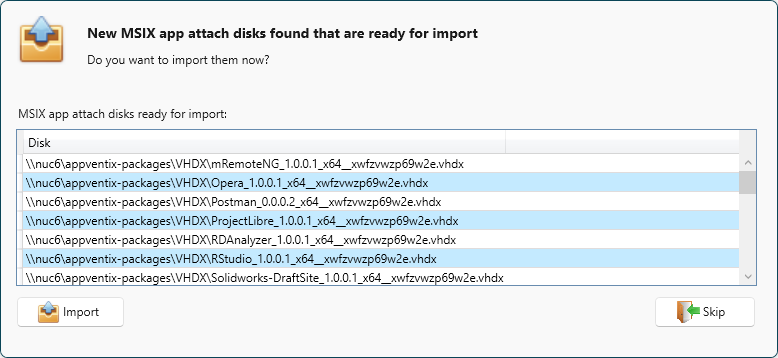
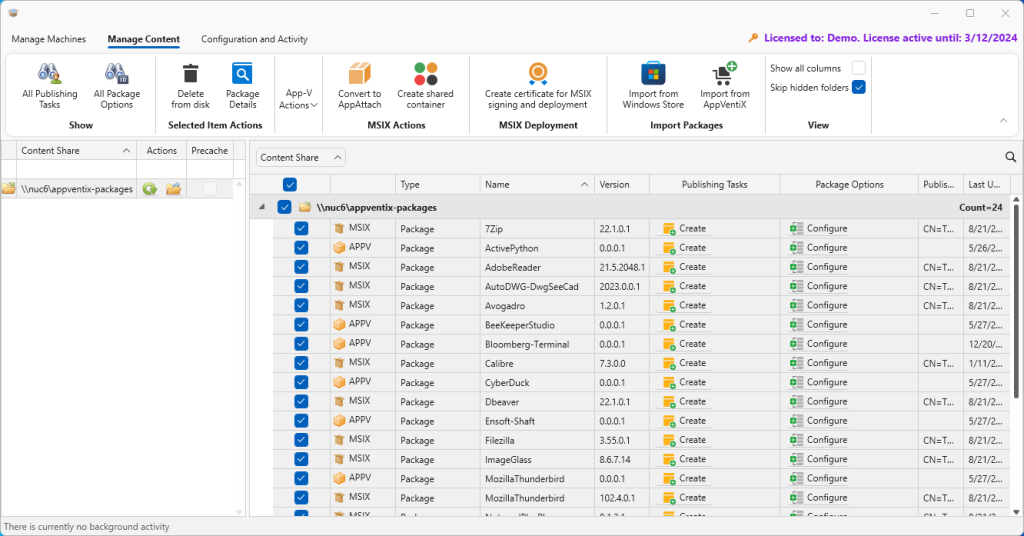
As I am not ready to publish these, I just clicked on the Skip button for now to ignore these. I can always bring them in by clicking the button to refresh the inventory when I need them. The inventory is shown, and from here I can create publishing tasks for the packages.
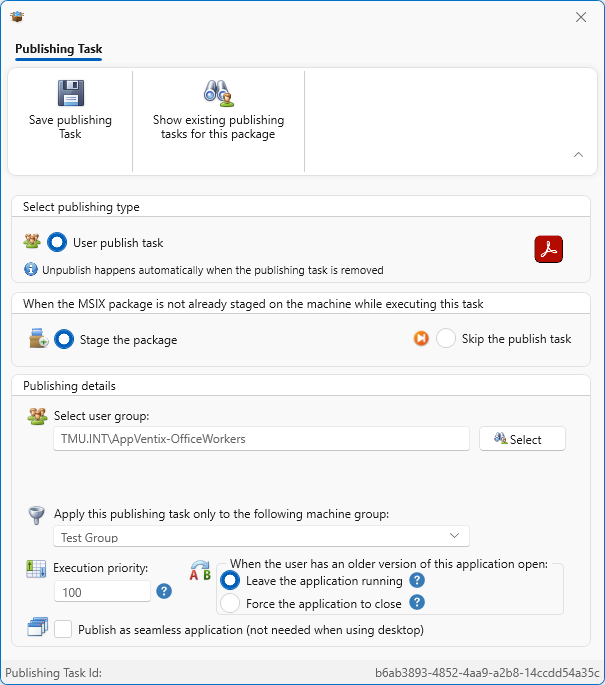
To start with, I just want to create the publishing rule for a single App-V package. I clear the selection list, click that ActivePython package I want to work with and then click the Create button for that package in the Publishing Tasks column.
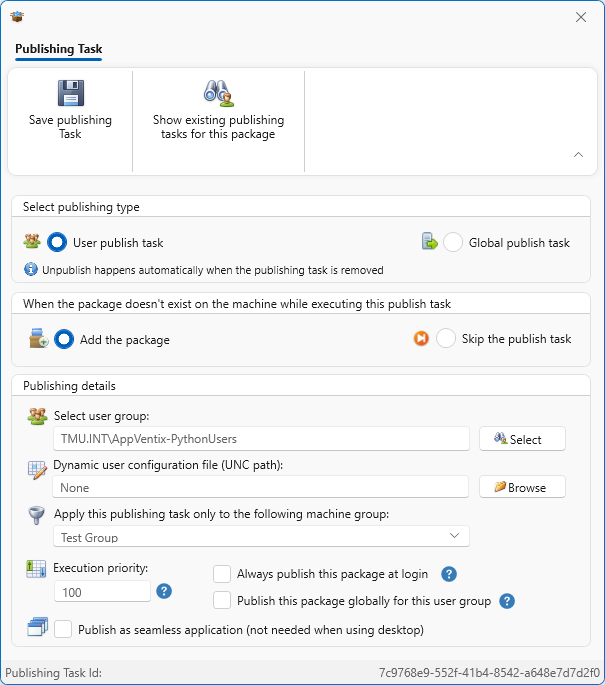
In the dialog I select the AD group for a set of either machines or users that will receive the package. My security group here is a set of users, which is how most organizations want to do application publishing. I also specified the machine group (even though I only have one machine group currently). This allows me to create a different machine group in the future, and publishing is essentially and AND operation between the members of the user and machine groups listed. There are options that you might want for certain environments, but I am OK with the defaults. Be sure to hit that Save publishing Task” at the top of that dialog when done!
I also published the AdobeReader MSIX package, and as you can see the dialog is really the same:
Testing As an End-User
At this point I can log into one of the member computers of my test machine group using one of the logons associated with the user groups. I’ll select a user that is part of both of those user groups that I used for publishing first.
The agent was configured to perform any publishing tasks upon logon. This means that it checks with the configuration share xml files to determine what needs to be published.
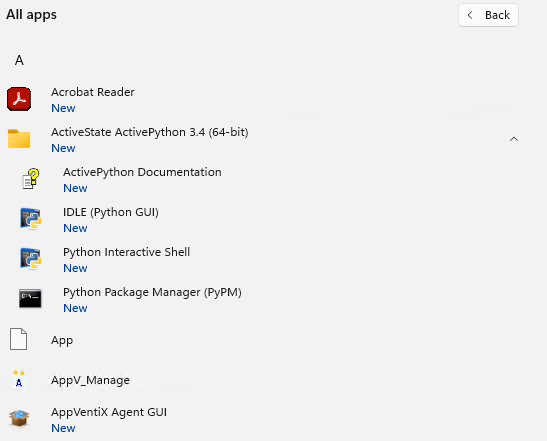
After logging in the publishing occurs, and I can see both the App-V app (Active Python) and MSIX app (Acrobat Reader) present in the start menu.
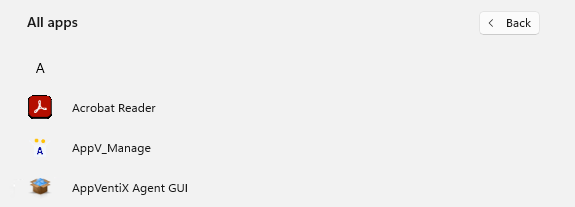
Logging in (even on the same computer) using the user account that is only a member of the office users group shows that only the one app was published.
More Management
Returning to the Central View console, you can now look at the additional management capabilities. To do this you first select the Manage Machines menu, then select a machine group to work with.
AppVentiX produces a very low overhead. It never automatically polls clients for information, so you’ll need to request an inventory, which can be done against a particular client or the entire group.
In the image below, I have requested an inventory of users against our test machine by clicking on the users icon (second icon in the Machine Actions column on the left). Because the Active Feature in the ribbon is set for MSIX, I only see MSIX packages published to those users.
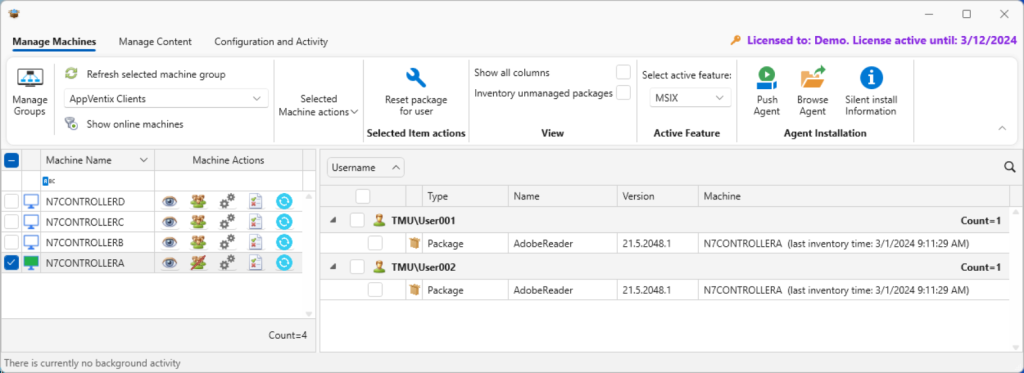
If I select App-V for the active features, then I can see the App-V packages.
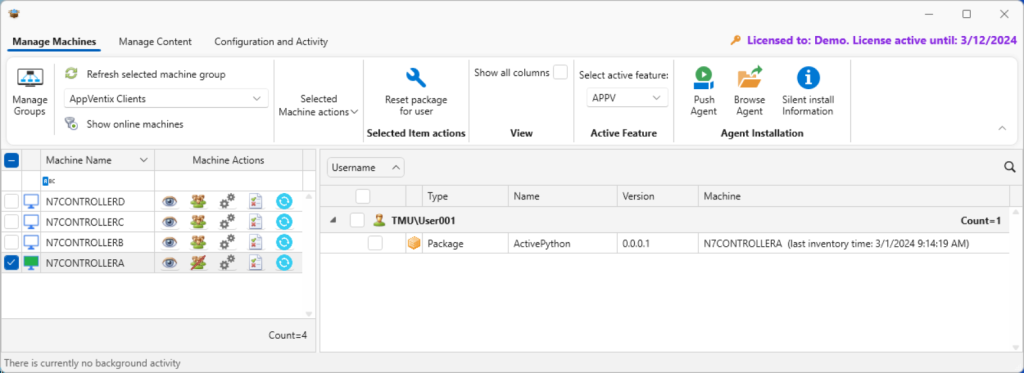
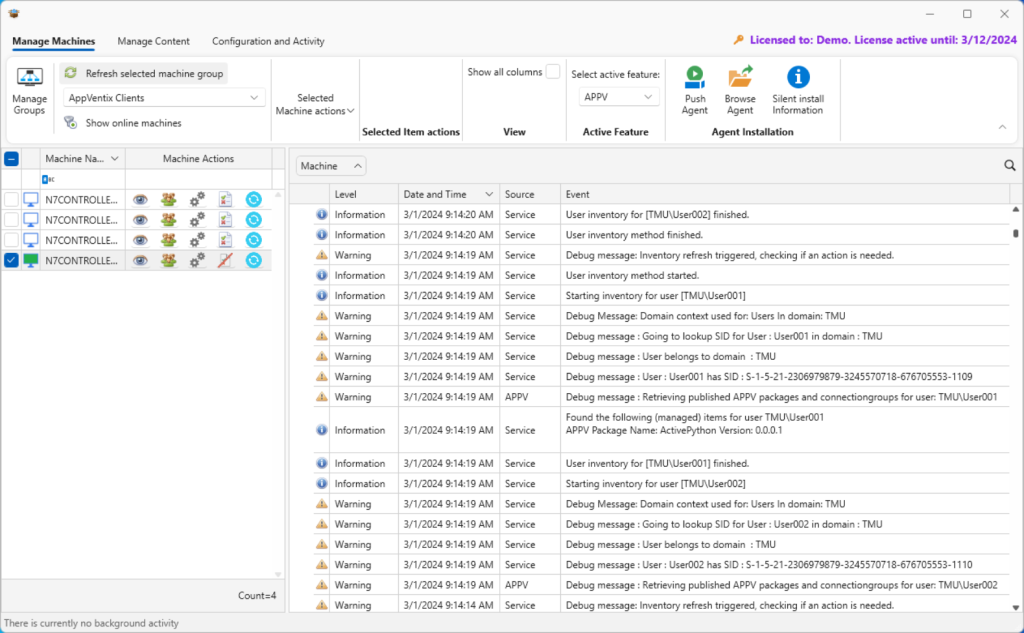
For troubleshooting inventory problems, Click Events inventory icon (4th icon in the list) in the Machine Actions column.
Out of the box
Straight out of the box AppVentix is easy to set up and use. You’ll need to keep in mind that while you can have multiple administrators if you are careful, it isn’t built with roll-based administration or backup features to avoid conflict between administrators.
App Attach
You remember that I had those App Attach packages? If there are any packages that are CimFs, to import those into the console, you have to start Central View using the Run As Administrator option. Going to the Manage Content menu, I clicked the Refresh Inventory button in the Actions column of the content share. It detected all three types of App Attach files that I had in the share (VHD, VHDX, and CIM) and I asked to import them. The VHD and VHDX forms imported just find but there was an issue importing the CIMfs packages.
I checked with their support and there was an issue with how those CimFs packages were built; an issue they have a fix for and will be in the next release. So for now I recreated the CimFs packages by converting the original MSIX packages using the feature in AppVentiX Central View (not shown here). Note that if you use the Convert to AppAttach feature to convert an MSIX package make sure that you convert a non-production copy as they will back-up the MSIX package after converting, taking it away from any users!
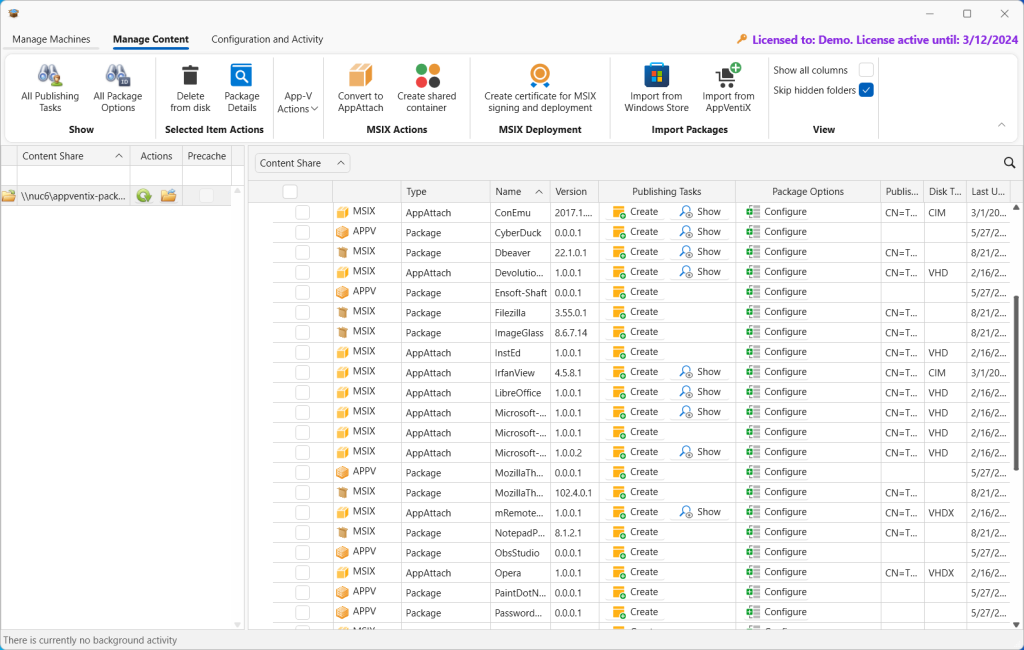
I published a few AppAttach packages from all three AppAttach formats. The packages may be shown in the content inventory as seen here after I created a publishing task for the Microsoft-PowerBI-Desktop VHD package to the Python group and Project-Libre to the Office Worker group.
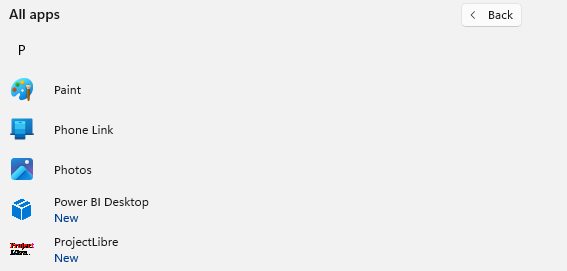
Logging back in as User001 (member of both groups), I quickly see that the new apps have both been added to the start menu.
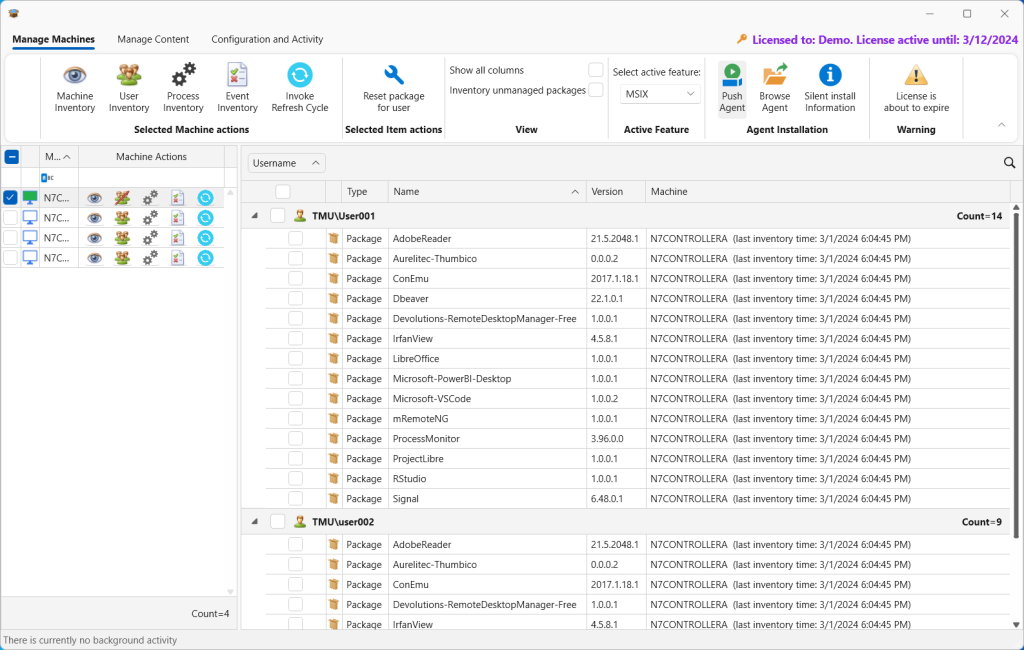
After also logging in as User002, the user that is not in the Python users group, I returned to the console to look at the published packages from the Central View. Here you can see that User001 has 14 MSIX/AppAttach packages published while User002 has only 9.
Conclusions
AppVentiX is designed for simplicity. The features were designed to meet the needs of any organization that wants to deliver applications with minimal administrative requirements. This focus on simplicity means that it doesn’t come with complex infrastructure requirements. It has great use for smaller organizations, but also for targeted portions of a larger organization such as for managing the apps on Azure Virtual Desktops. The product works on both cloud and on-premises scenarios equally well, which makes it suitable for many organizations.
Once I had the first app published, publishing additional packages is as simple as it would be in any application management system.
The tool has many features built in that I don’t have time to explore here, but it is clear that this is a vendor that listens to their customer needs and adapts features that allow them to do what they need. Whether you are running up in Azure, where they have features that nobody else has, or just a traditional RDS or VDI implementation in-house, this is a pretty neat tool.