 This has to rank among the top posts that I never thought I would write in my entire life. I mean, it is right up there with “Why I’ll never play golf again”. If we had subtitles, the subtitle of this article would be “The 5.1 Converter Doesn’t Suck“. High praise indeed!
Abstract
This post details out how to organize an efficient conversion project to move packages from Microsoft App-V 4.x to 5.x. The example project uses App-V 5.1 and the free AppV_Manage tool (5.1.3) to efficiently manage the process.
The Back Story
When Microsoft re-wrote App-V in version 5, they made such major changes to how application virtualization worked, modernizing it for today’s platforms and apps, they had to change for format of the packaged applications in an incompatible way. To recognize how dramatic that is, the last time there was a major breaking change in the format was back in 2003.
So as part of the 5.0 release Microsoft included a package conversion utility. They told us how wonderful it was. We (the App-V MVPs) tried it. It wasn’t. We generally told customers that it probably wasn’t worth the bother. Particularly galling was that it worked better on packages that were originally sequenced to the VFS instead of into the root folder. Microsoft continued recommending root folder sequencing right up to the end of 4.x (even though I started training people to use VFS installs years before). So a very large portion of converted apps wouldn’t work for Microsoft customers that I didn’t train.
So Microsoft improved it in 5.0 SP2. We tested it. It wasn’t that improved.
Then they improved it in 5.0 SP3. Maybe others tested it, I didn’t bother.
Then they improved in in 5.1. Being jaded, I barely even noticed it in the ReadMe for the release. But it was a side discussion that I had at the MVP Summit with the development team that lead me to give it a shot. While the long version of the results are in the post below, the bottom line is the 5.1 converter doesn’t suck. They have taken a lot of feedback from customers that tried conversions in the past and made changes so that those packages will now convert. It doesn’t mean they all work, but for those that haven’t made the move over to App-V 5 yet, it is probably worth the effort.
Overview of my Conversion Process
Moving from 4.x to 5.x should be treated a project. If you use the App-V Management Server, you’ll be replacing the servers. You’ll be installing new App-V Clients — maybe in parallel or maybe as a replacement. And you need to convert or repackage the apps.
That last sentence, convert or repackage, shouldn’t be taken lightly and should be run as a project all on it’s own. Just as it would be to certify the apps on Windows 10 (which you should do as part of this project anyway), you’ll need to test, test, test. The image below is an overview of that process:
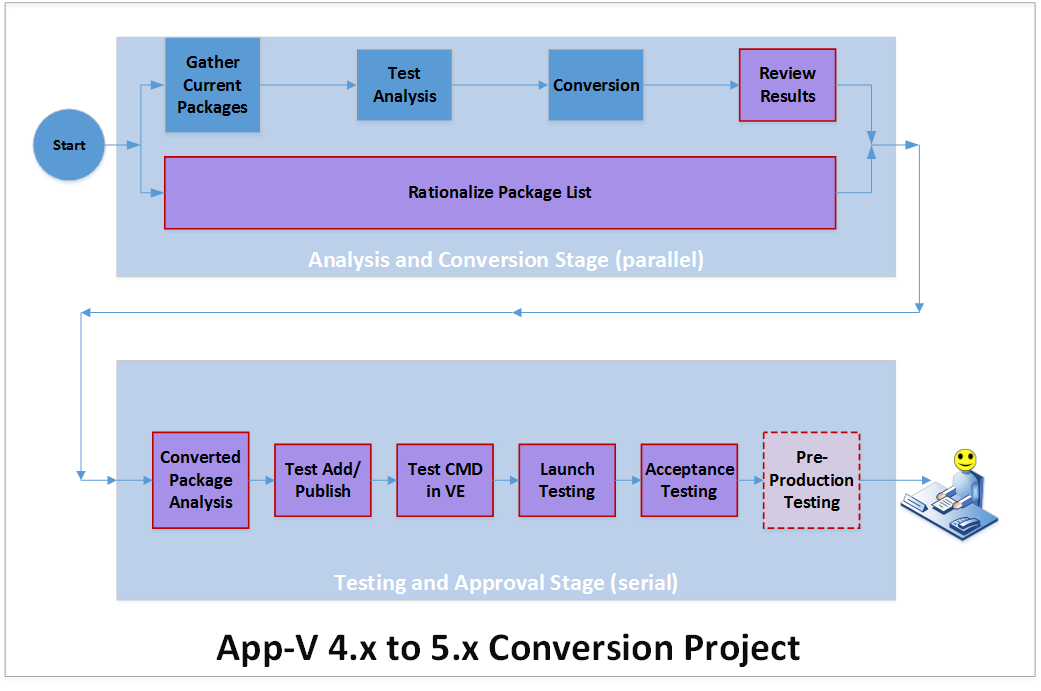
The work-flow has two distinct stages, conversion and testing. Each of the red-tinged boxes are tasks which may result in a package being removed as a candidate for conversion. Note how happy the user looks at the end of the project!
Stage 1: Conversion
It starts by getting a list of all of the existing software packages.
Because the work is automated and difference in effort to attempt conversion of an extra package is quite minor, I prefer to attempt the conversion on every package, so I don’t prefilter.
In parallel, you will want to filter out some of the packages. Often, this effort is actually performed by someone other than the hands-on person doing the rest of the work in this stage.
This might involve running reports from the existing management server to determine apps that really aren’t being used. You should probably involve the business units to review the list and at least give them an opportunity to say they don’t need some of them. You can do this filtering up-front, but I depict this as happening in parallel during stage 1, as I find it better to do the first part, which is quite automated, against all of the packages in case some packages get filtered out and down the line someone pops up with a need for a filtered out app.
As part of filtering, you will also want to develop a prioritization of the list. This will dictate the order in which packages are verified and, if necessary, remediated. You should also consider whether you want a policy to attempt remediation, or just mark for repackaging, any issues found.
The converter requires the 4.x packages to be up to 4.5 to be converted. I suppose you could open and save older packages in a 4.6 based sequencer first, but maybe those should be repackaged anyway.
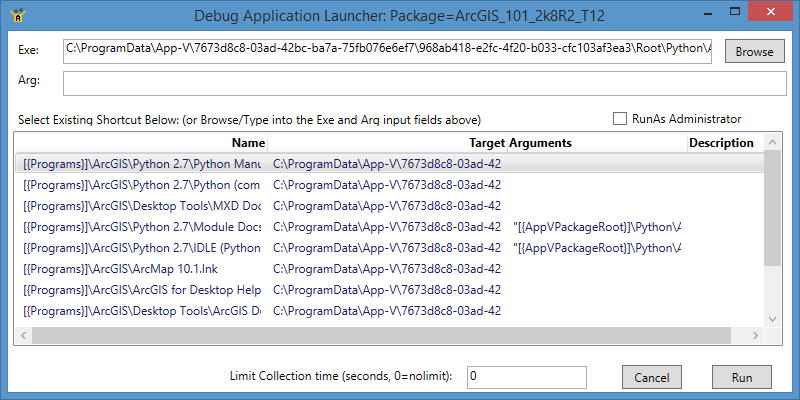
Stage 1 Details: VM Prep
You basically use a VM with the latest version of the sequencer on it. If there are any apps that were sequenced on an x64 OS, you’ll want this VM to be x64 also. There are two parts to the conversion, which is done via a script in an elevated (RunAs Administrator) 32-bit PowerShell window.
The conversion doesn’t care what is on the VM, so it doesn’t need snapshots of clean machines – there is no runtime monitoring involved, just an asset conversion.
You will want a folder that has all of the existing packages under it. It doesn’t matter what the folder structure is, and it can be a network share. You can point it to the current content store of your production packages as no files are opened for write access.
You will want an empty local folder that will store the converted packages.
You will want a PowerShell script to perform the conversion. Here is a link to a zip file containing my script. The script has a bunch of special stuff to take care of weird things like multiple copies of the same package and it provides some statistics. The only thing you need to do is change the first two non-comment lines, where you reference the source folder (or share) of the content source and the top level destination folder.
Stage 1: Testing and Converting
The script will test each package to see if it is likely to convert. If there are no errors recorded, it will then run the conversion. The conversion also runs the test, but there are situations where the conversion fails to display a warning because of a secondary issue that only is found during conversion — and I like to know about all of these when I review the output.
You just start the script and come back later on to review the results. The script provides on-screen display as it is working, and each output folder has a copy of the test/conversion results. I did find a couple of situations where the on-screen display reported an error that didn’t appear in the output — so you’ll want to scan the on-screen display for red text.
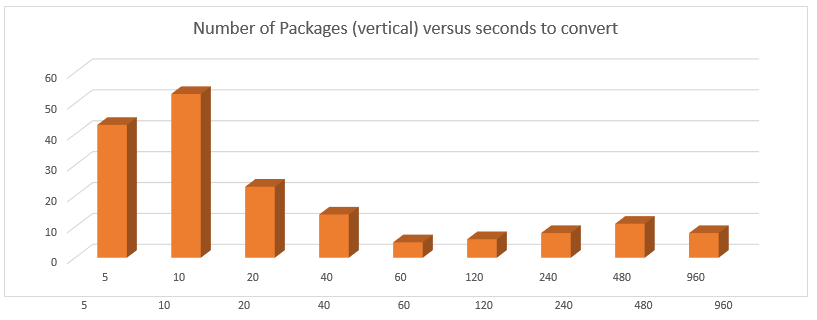
On my system with my packages, it took between 5 seconds and 15 minutes to attempt to convert each package. The larger times are for very large packages, like AutoCAD and ArcGIS.
In my sample of 170 packages, I averaged 1.25 minutes each, but as you can see in the graph below, most packages convert quickly.
Stage 1: Analyzing Conversion Output
The packages that I ran were not necessarily production quality packages. I simply took a subset of packages left over from some of our old App-V 4.x training classes, created by people that were learning and weren’t necessarily great packages. So some of the problems that I found were simply bad 4.x packages to start with and you probably won’t run into these yourself.
Here is a sample output file, ConvertedTestOutput.txt, produced by the script:
Monday, November 9, 2015 8:57:39 AM
TEST CONVERSION:
Source      : \\tmuhost\Content\FB_APPS\IBM_WMBToolkit_7.0\5_ProdRelease\App-V
Errors      : {
              The package converter detected one or more applications in your package that is targeted for an
              unsupported operating system.  This package cannot be converted unless the target operating system
              restriction is removed from the .osd file.
              }
Warnings    : {}
Information : {}
Target      :
ACTUAL CONVERSION:
Source      : \\tmuhost\Content\FB_APPS\IBM_WMBToolkit_7.0\5_ProdRelease\App-V
Errors      : {
              The package converter detected one or more applications in your package that is targeted for an
              unsupported operating system.  This package cannot be converted unless the target operating system
              restriction is removed from the .osd file.
              }
Warnings    : {}
Information : {}
Target      :
The issues that the test/conversion found in my packages included the following lists:
Errors
- Target OS in OSDs. The original packager had specified particular OS versions that were supported by the package. Normally, I don’t recommend setting these but some companies do. If the listed OSs in the OSD files include OS versions not supported by App-V 5 (such as Windows XP or Vista), the test package will fail. This package is a good candidate for remediation by removing the OS version tags in the source OSD files.
- Multiple sprj files in the folder. You must use a folder with only one sprj file as the source. Sometimes people mess this up, especially with package upgrades. This package may also be a good candidate for remediation by separating out things.
- Invalid OSD File. I’m not sure exactly what was wrong with the file. It pointed to an invalid character at a specific line and column of the file. Clearly the packager had manually edited the file in an attempt to solve elevation, setting an environment variable “__COMPAT_LAYER”. The location of the error was pointing to the first underscore. Possibly this is a converter bug, or perhaps the user edited using a different language pack or something else strange (we get a lot of Europeans coming over to our classes). In any case, I know that setting this inside the package won’t help and in App-V 5 you must use a start of VE script to do the equivalent. So, at least in this case, the package might work with remediation – removing the offending line from the OSD and adding in the appropriate script in the DeploymentConfiguration.xml file.
- Missing OSD. The sprj file listed an OSD file not present. Probably a bad input package at this point and resequencing is recommended.
- Inconsistent Environment Variables in OSDs. The original packager manually edited the PATH variable in some, but not all of the OSD files. Because the environment variables are no longer set at the application level, but at the package level, the converter doesn’t know which PATH to take. This is a candidate for remediation by fixing the source OSD files to be consistent.
- Failed to generate MSI. The name of the input sprj file was simply “.sprj”. Probably a failed attempt by someone to rename the file. So I’d be inclined to just repackage – even though I don’t care about the optional MSI.
Warnings
- Missing ICON Folder. Some source packages that are essentially middleware or plug-ins, in particular ones that have no shortcuts or file associations, will generate this warning. You may safely ignore it.
- Duplicate Shortcuts. This requires remediation or repackaging.
- Dependency Group. This is a great warning! It tells you that this package is part of a Dynamic Suite Composition (DSC) group, and lists the other packages in the group. The conversion is otherwise OK, it just reminds you to also build a new App-V 5 Connection group to complete the functionality.
- Script reference with a ScriptBody. This will require manual massaging of the DeploymentConfiguration file to achieve the equivalent.
- Script with Event=Launch. This requires manual work. If only one of these warnings occur, you can tie the action to the AppID in the new package, but if there are multiple App-V 5 doesn’t allow that. The solution is to combine individual app scripts into a start of VE script, or to embed the scripts as files in the package. The file in the package will have to add the app launch, and you would need to change the shortcuts to launch the file. You’ll still have to do that work with repackaging, but I’d probably go with repackaging.
- Script with Event=Launch and Timing=Post. App-V 5 has no equivalent script. Maybe you really want to move it to a termination of the VE script. Otherwise make it a file to launch the app and then do the script action when it returns and change the shortcut to point to this. You’ll still have to do that work with repackaging, but I’d probably go with repackaging.
One of the more pressing issues in conversion is that until recently was that all OSD scripts were silently ignored. But in 5.1, the converter now converts a the OSD scripts that were “HREF” style scripts for start and end of the Virtual Environment (VE), which is most of the scripts, and it warns you on anything else. HREF scripts were one line scripts, so it was easy to handle those. For ScriptBody scripts, you probably want to place the text into a cmd file and add it to the package, and then add a script to the DeploymentConfig file to run cmd.exe with the file. For extra points, you might try just using the ScriptRunner with multiple lines instead (if the ScriptBody had multi-line things like if/else or loops this won’t work and you’ll have to create a cmd file).
Ultimately with 5.1, I really prefer scripts to be actual files in the package (easier for others to maintain), and the request for them to run done by editing the internal manifest file. So if script issues pop-up I probably want to repackage.
Stage 2: Testing
Stage 2 is where the real manpower effort is going to be expended. Unlike Stage 1, where a half-day effort might be all that is required to handle all the packages, stage 2 happens pretty much serially (perhaps some parallelism with multiple people involved) and each package processed has a significant amount of effort involved with it.
You will end up repackaging some apps, so you want to filter out bad candidates as soon as possible to reduce the amount of rework required for the project.
The problem with information available from the conversion is not what the previous process tell us is wrong. Those are valid problems that must be dealt with manually. The problem lies in what it doesn’t tell us; so you’ll have to test every package.
In the workflow, I break this down for an efficient process to quickly weed out bad candidates.
Stage 2: VM Prep
The first four steps of Stage 2 are performed by a packager on a special Virtual Machine. This should be a clean version of the OS with the App-V Client, and the (free) TMurgent tool AppV_Manage. You will want to download the latest version available, at least 5.1.3 (as changes were made to support converted packages). You configure AppV_Manage to point to the network share where all the converted packages are located. You should also configure the App-V client to use Shared Content Store Mode (even if the client VM isn’t inside the data center) to speed things up.
You will want a snapshot of the VM so that you can revert to this clean-and-ready-to-test image. Even though the apps to be tested are virtualized, reverting the snapshot before each package is to be tested is important to reduce confusion due to publishing activities that occur outside of the virtual environment.
Stage 2: Analyze
You start up App-V Manage, select the package, and click the Analyze button. The software will run a static analysis of the converted App-V Package. This analysis is primarily designed to detail out what is in the package, which is less interesting for converted packages, but it does call out certain issues.
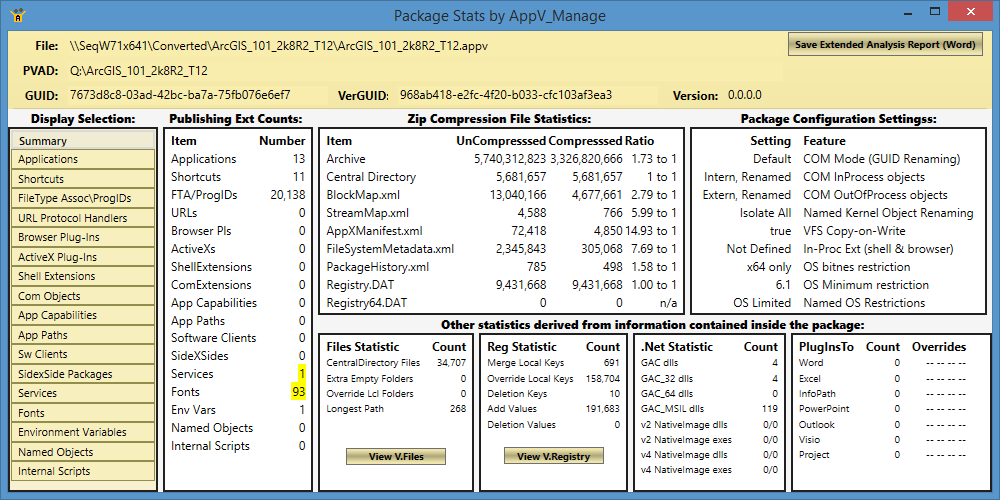
The yellow highlighting is largely what you are looking for. You can ignore the highlighted Fonts, as it just points out that there are some non-installed fonts in the package. Since the app was OK in 4.x, these don’t matter.
To investigate the Services warning, you click the button labeled Services on the left to see the detail.
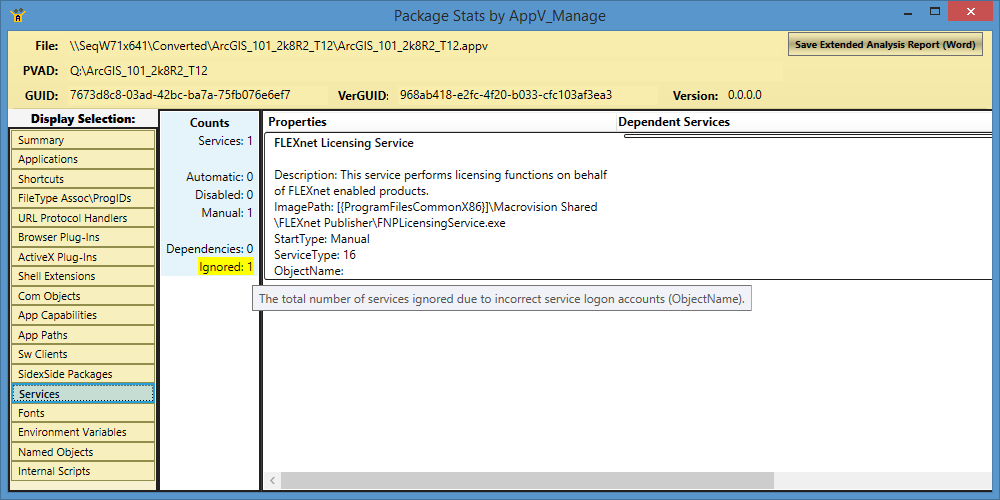
For my packages, the primary issue I found in the Analyzer was with virtual services. While App-V 4.x supported virtual services running under different accounts, App-V 5 will only virtualize services marked to run in the LocalSystem account. So it ignores everything else. If the service is important, you’ll need to repackage, changing the account to LocalSystem.
Stage 2: Add/Publish
Using AppV_Manage, you add and publish the package. If there were OSD modifications in the old package, such as scripts, you’ll probably want to add the package with the DeploymentConfiguration file.
In my testing, only a couple of packages failed this step, and that was because the input packages were bad. In both cases, someone had attempted to change the filename of the sprj file, and had ended up with a file named “.sprj”. While that worked in 4.x, you can’t have an App-V package filename of “.appv”, which is what the converter generated. Those packages had to be resequenced.
Stage 2: CMD in VE
With the package published, you click on the Debug Packages tab of AppV_Manage, select the package, and click the CMD button on the bottom of the interface.
This launches a cmd prompt inside the virtual environment. If the Analyzer showed that the package had autostart virtual services, you should check the list of virtualized processes in the AppV_Manage tool to see if the service started. If there were start of virtual environment scripts to be run, check that these were successful. A failure here means you should probably resequence the package.
Stage 3: App in Debug
After closing the CMD window, click on the App button on the bottom of the AppV_Manage Interface. This will provide you a selectable list of the shortcuts of the package.
Pick the shortcut you want to launch and click the Run button. Not only is it easier to find the shortcut (especially when testing on a Windows 8-10 system), you get a bonus runtime analyzer that will help you hunt down issues that might come up.
As part of a conversion project, you might not want to spend time with the runtime analyzer other that as a launching utility (you can click the pause button on the monitor dialog that appears to speed things up on large packages). Instead, you probably want to use it only to investigate any runtime issues that appear prior to repackaging.
App Expert / Pre-Production Testing
An identified application expert, often someone from the business unit that uses the application, runs a more thorough test of the application. This is more likely to be done using the appropriate deployment mechanism (App-V Server or Configuration Manager) to also test the distribution steps.
Additional pre-production testing might also later occur, especially with business critical applications.
Summary
This article provides some decent approaches to a conversion project. The percentage of packages that will successfully be converted will vary significantly, so I’m not going to quote you a number. The mixture of packages that you have, especially involving very old apps and in-house apps, will have the biggest impact on the number. With in-house apps, you can often expect a very high (near 100%) or very low (near 0%) conversion rate.
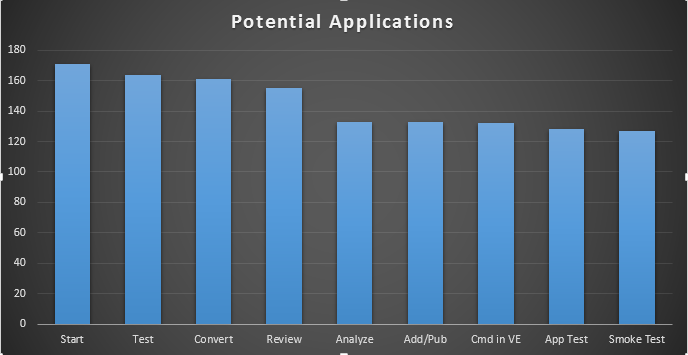
So how did my sample of not-quite-ready-for-production packages work out? The chart below shows the filtering process through the smoke test.
So what did it take for me to do this on 170+ packages? From the start through completion of the static analysis (the first step on Stage 2) it cost about 1 man-day. Mind you I wasn’t doing any Rationalization, so consider that cost as well. At that point, you can see above that most of the bad packages had been eliminated from the pack. The remaining work took about 10-20 minutes per package on average. A full test of the package functionality would still be needed, and that would be more costly than the time spent so far, but not bad!
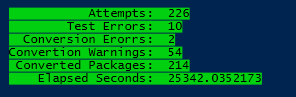 I ran a second pass on stage one on a larger set of packages, including many that were considerably older. Here is how they did. Not bad, eh?
For companies with a large inventory of 4.x packages, I believe it is worth the effort.
For additional information on converting packages, please refer to https://technet.microsoft.com/en-us/library/jj713472.aspx