


This is a demo of TMNetSim (demo requires Silverlight):
When deployed on a stand-alone PC:
- Configure the Inbound Port to the port the server protocol under test normally listens to.
- Configure the Outbound IP Address to the address of the server.
- Configure the Outbound Port to be the port the server protocol under test listens to.
- The client program uses the normal port number, but should be directed to use this PC as the "server" to connect to.
When deployed on the Client:
- Configure the Inbound Port to be the port the server protocol under test normally listens to.
- Configure the Outbound IP Address to the address of the server.
- Configure the Outbound Port to be the port the server protocol under test listens to.
- The client program uses the normal port number, but should be directed to use itself (localhost or 127.0.0.1) as the "server" to connect to.
When deployed on the Server:
- Configure the Inbound Port to an unused port on the server. Often this can be one less or one more than the port that the protocol under test normally uses. You may use the cmd "netstat -p TCP" for a list of ports currently in use.
- Configure the Outbound IP Address to the address of the server (or 127.0.0.1)
- Configure the Outbound Port to be the port the server protocol under test listens to.
- Configure the client program to use the Inbound Port number instead of the normal port it uses.
Connection and Global Control settings are only read when the service engine is started via the start button. To modify parameters on a conversation without stopping the service (which would disconnect all conversations), double click on a conversation in the list and make parameter modifications in the dialog box that appears.
Common Port Numbers:
| 1494 | Citrix ICA Client Connections |
| 3389 | Microsoft RDP Client Connections |
| 80 | HTTP Traffic |
Note: TMNetSim will generally not work with secure protocols.
Meaning of Delay Base and Jitter
When a Delay Type other than fixed is selected, you will need to enter both the Delay Base and Jitter. The Jitter refers to the total range that packets might vary. Thus a Delay Base of 50ms with a Jitter of 20ms will result in packets that range from 40 to 60ms (50 plus or minus 10).
Examples of the Effect of Delay Type Selection
Selecting a delay type affects the regularity of the output as packets pass through the network simulator. The following four graphs are examples of actual delays given to packets in a series of tests performed using the different types of delay settings (Note: in each case "preserve order" was disabled).
Fixed Delay
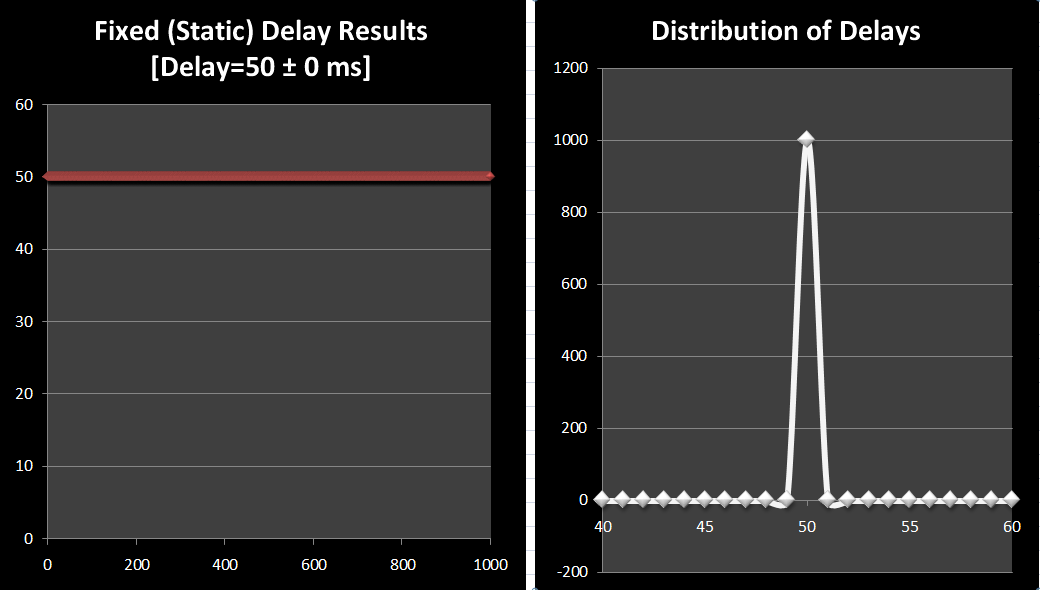
The delay in this example is fixed at 50ms. There is no delay variability.
Variable - Gaussian Delay
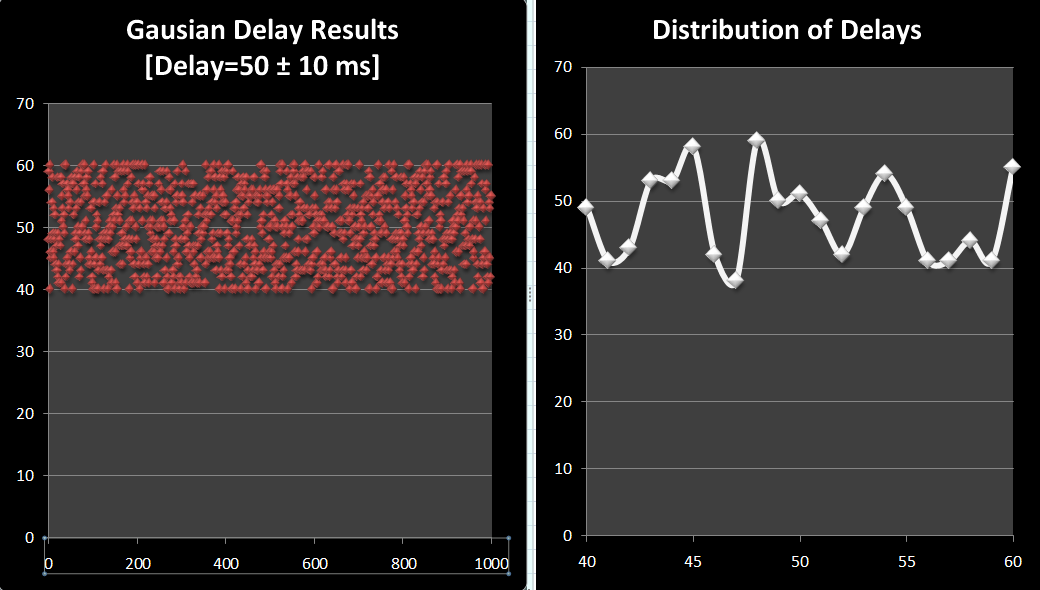
The delay in this example is completely random within the selected range of 50ms plus/minus 10. Gaussian delays are completely random within the range, and will average out more with more packets.
Variable - Normal Delay
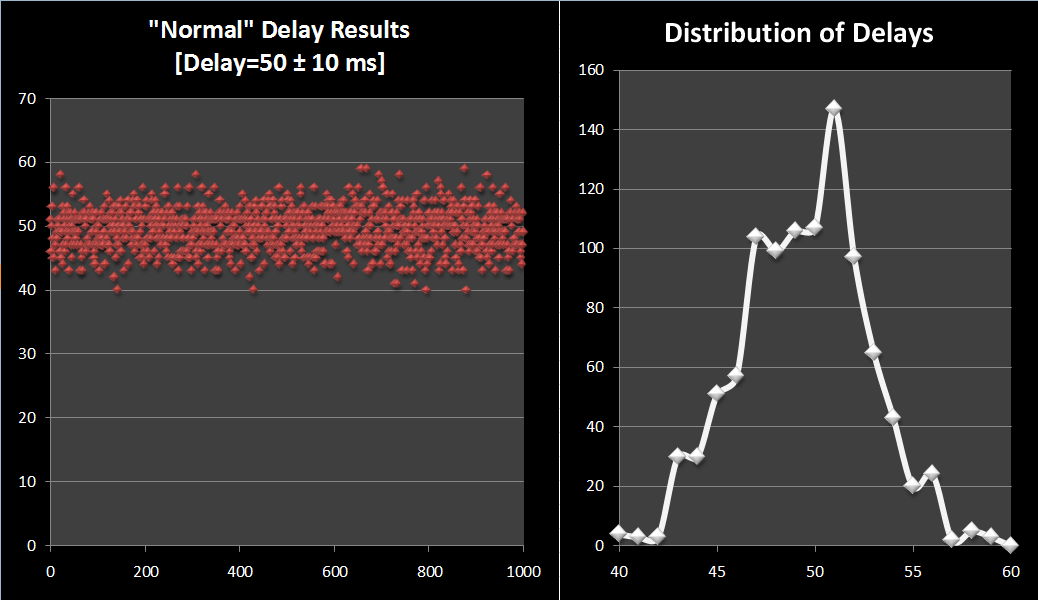
The delay in this example also falls within the range of 50ms plus/minus 10, however, the variability follows a normal curve. This causes most of the packets to be near the center of the range. The edges of the range can have a small bump in the distribution because we truncate values that would be farther out (which rarely occurs).
Variable - Markovian Delay
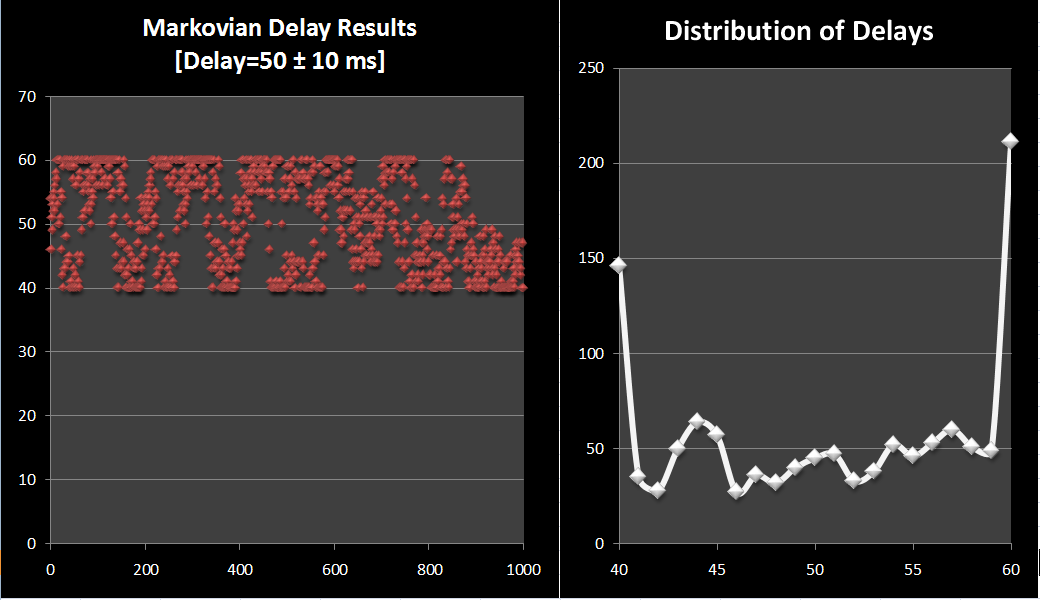
The delay in this example uses Markov Chaining. In the delay graph there are two streams, one in each direction, and clustering of delays for each stream can be discerned somewhat in the graph on the left. The delay to all packets also falls within the range of 50ms plus/minus 10, however, the delay of a packet on a given stream is influenced by the delay of the previous packet on that same stream. This makes for a more "burtsy" output, which mimics the actual behavior of congestible shared networks better than the other delay types. As can be seen in the Distribution graph on the right, most of the packets fall in the extremes. The left hand extreme represents the minimum physical latency of the link, while the right hand extreme attempts to mimic the "worst case scenario".
Packet Loss Option
When selecting loss, packet loss occurs in a Gaussian manor (randomly). For many TCP based protocols, it does not take much random loss to break a connection, especially if you apply loss in each direction. For example, under RDP or ICA a 3% loss rate in each direction will bring down a session.
Packet Capture Options
When enabled, Packet Capture will create two text files in the current working folder for each protocol session. The files will capture each direction of the session separately. Naming convention on the files includes "IB" and "OB" and include the IP addresses and Ports involved in the conversation. All lines in the logs are time-stamped so that you can match up the full conversation. When selecting packet capture, you can request text and/or hex logging.
AutoStart Command Line Option
TMNetSim will remember Inbound and Outbound Connection Settings in the current user's Windows Registry. When TMNetSim is started using the /a command line option, it will automatically start listening for connections on the parameters stored in the user's registry hive (\\HKEY_CURRENT_USER\Software\TMurgent\TMnetSim).
TMNetSim 2.04 Zip File: X64 version
TMNetSim 2.04 MSIX: MSIX Windows Store version
Additional tools for performance have a segregated list here.